
Based on my recent experience in developing enterprise iPad apps and the ever-growing market hunger for tablet apps, I decided to share my knowledge and write down a quick guide to the process.
This guide is aimed at those who know their way around HTML, CSS and Javascript (maybe even at a beginner level), and would like to create iPad and iPhone apps but just don’t have the time to invest in learning specific and complex programming languages, like Objective-C.
Get your tools ready
First things first: let’s make sure you have the correct tools for the job.
In matters of hardware, you’ll need an Intel-based Mac computer running on Mac OS Lion (or greater) as well as an iPad (if you want to have the app installed on an actual device, but more on that later).
On the software department, there are two required apps:
Xcode
The goto-IDE for anything that runs on Apple devices. You’ll need Xcode not only to test the app on the iOS Simulator but also to install and run it on devices. And being a code editor, you can also use it for HTML / CSS / Javascript.
Get it from the Mac App Store.
After installing Xcode, you’ll also need to install the Command Line Tools (Xcode Preferences > Downloads > Components > Command Line Tools > Install).
PhoneGap
Bought by Adobe a couple of years ago, this framework is the secret ingredient that allows HTML developers to build iOS apps without knowing any Objective-C at all. It’s based on Apache Cordova (hence why you’ll see references to it later).
Get the latest release from PhoneGap.com.
After installing PhoneGap (using Node.js), go ahead and install the Cordova command line tool. On Terminal.app, run the following command:
$ sudo npm install -g cordova
This one is optional, and also a personal preference, but you should have a good code editor for HTML / CSS / Javascript. There are many options available (some free, others not so much) but if you — like me — prefer a code editor lighter than the heavy-weight-champion Xcode, these are the ones I can recommend, just pick one: TextMate 2.0, Sublime Text, Coda 2, Brackets and the good ol’ TextWrangler.
A bit of scaffolding
Yup. Let’s get this project off the ground!
Once your tools are installed and ready to roll, you’ll need to create your PhoneGap project for Xcode that will allow you to test and run your app on both iOS Simulator and devices, as well as deploying your app for App Store, Ad-Hoc or Enterprise Distribution.
For the sake of your own peace of mind, it’s best to keep things organised, so make sure you save all project related assets in a single folder.
For me, that’s a folder named after the project, inside the Projects folder, which lives inside my Documents folder, so my project folder path ends up like this:
~/Documents/Projects/ProjectName
Assuming you already installed Xcode, PhoneGap and the required command line tools, you are now only two commands away from having the iOS app up and running. The first one generates the project folder with all required PhoneGap assets and the second creates the actual project to open in Xcode and deploy to devices.
To generate the PhoneGap project you need to specify three parameters:
<project_folder_path>: where all the project assets will be saved (it must be empty, if it exists already)<package_name>: must be unique, as it identifies the app (follow a reverse domain convention, eg:com.mydomain.MyApp)<project_name>: whatever name you want, eg:"MyApp"
And use them with the command cordova create, as such:
$ cordova create <project_folder_path> <package_name> <project_name>
Let’s give this project the very creative name of… “HelloWorld”! Yes, unheard of.
As per my suggestion above, the <project_folder_path> can be ~/Documents/Projects/HelloWorld and the unique <package_name> can be com.example.HelloWorld.
So in Terminal.app, run the following:
$ cordova create ~/Documents/Projects/HelloWorld com.example.HelloWorld "HelloWorld"
If you then browse to ~/Documents/Projects/HelloWorld, you should find four sub-folders inside: merges, platforms, plugins and www.
All there? Cool! That’s step one.
In step two, you specify the target platforms your app will support.
Since we’re aiming to build an iPad app, we only need the iOS platform.
Back to Terminal.app!
Browse to the newly created project folder with the command:
$ cd ~/Documents/Projects/HelloWorld
And then add support to the iOS platform:
$ cordova platform add ios
Your app is ready to run on the iOS Simulator!
Just open the file Hello World.xcodeproj in the folder ~/Documents/Projects/HelloWorld/platforms/ios and hit that big Play button on the top left corner of Xcode.
Boom! Done.
What you should be seeing now in the iOS Simulator is an iOS app built using just the HTML / CSS / Javascript from the www folder in that same ios folder.
When you are done looking at this little gem, hit the Stop button in top left corner of Xcode to stop the simulation.
For now, you can ignore the www folder in the root of the project folder (outside the ios folder). But later, specially when developing an app for multiple platforms (eg: iOS + Android), you’ll want to update only this www folder instead of the one(s) inside the platform specific folder (ios/www or android/www) and run the prepare <platform> command to update the modified files in the platform’s www folder, like so:
$ cordova prepare ios or $ cordova prepare android
Creating your app
Now that we have a basic iOS app running, it’s time to start playing with it and learn with the process.
If you look into the contents of the ios/www folder:
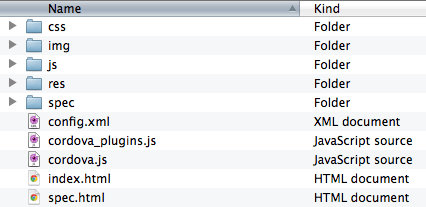
You’ll find the structure of a basic web app:
css: CSS stylesheets
img: images
js: Javascript files
res: app resources, like splash-screens and icons
spec: Jasmine tests
config.xml: to compile your app in the cloud using PhoneGap Build
cordova_plugins.js: a JSON list of the Cordova plugins installed
cordova.js: the Cordova Javascript library to interact with the device
index.html: the web app’s start page
spec.html: to run the Jasmine tests set in the spec folder
The main idea you should follow when developing your app is to use HTML5 and CSS3 for visuals and Javascript for logic and interaction with the device hardware.
As an example, let’s add a bit more of logic to the ios/www/js/index.js file:
In the function onDeviceReady (triggered when plugins have been loaded and device is ready), after app.receivedEvent('deviceready'); add the following line:
document.body.getElementsByClassName("app")[0].addEventListener('click', app.onTap);
This attaches a function to the click event on the first element in the DOM with a class named app.
Then right after the closing bracket (}) of the same onDeviceReady function, add this function (including the comma (,) in the beginning):
,
onTap: function(e) {
    var randomColor = '#'+ Math.floor(Math.random()*16777215).toString(16);
    document.body.style.backgroundImage = 'none';
    document.body.style.backgroundColor = randomColor;
}
This defines the function attached to the click event:
Once a user clicks / taps on the app element (that little bot) the background of the app will change into a random colour.
On Xcode, hit the Play / Run button to see this code change in effect.
Like it? No? Meh?
Let’s also add a little CSS3 touch to create a visual transition between the background colours.
Open the ios/www/css/index.css file and on the style definition for the body tag just add this line:
-webkit-transition: all 0.5s;
Now with every tap on the bot, the background will smoooooothly fade into a randomly picked colour. Yey!
Alright, al-right! So there are many more things that can be done using this framework, but the purpose here it just to get you into the basics of using PhoneGap for iOS development, therefore I will not get much more deeper into this, as the actual process of creating an app, from concept to design and production is a lengthy one and this post is already getting too long, but I’ll write more posts focusing on these steps later.
Before wrapping up this post, let’s just get on two related topics: PhoneGap 3 plugins and deploying your app into an actual device.
Plugins on PhoneGap 3.0
It’s important to note (before you start pulling your hair out) that, due to the new plugin architecture of PhoneGap 3.0, none of the plugins are installed by default in the project. This means that if you need to access device resources (like accelerometer or camera), you have to install a plugin first.
One of the plugins I recommend installing for all projects is the debug Console, which allows you to use console.log() to send messages to both Xcode and Safari browser on the computer running the iOS Simulator or connected to the iOS device (provided that you enabled the Web Inspector in iOS).
To install the Console plugin, browse to the project folder with the command:
$ cd ~/Documents/Projects/HelloWorld
And then add the Console plugin with the plugin add command:
$ cordova plugin add https://git-wip-us.apache.org/repos/asf/cordova-plugin-console.git
For a complete list of plugins, check the PhoneGap 3.0 CLI docs.
How to get the app on iOS devices
This is where the “free” ride ends, unfortunately. To get past this and run your app on your iPad or iPhone, you’ll need to get a developer’s license through Apple’s iOS Developer Program.
This license allows you to generate code signing certificates (aka Provisioning profiles) that will be embedded in the compiled app, and are required to run any iOS app on a real device and later submit it to the App Store.
Once you got your developer license, follow the instructions on the Apple Developers site to create and install the Provisioning profiles.
It’s a wrap!
There you have it! An overview of how to create an iPad or iPhone app using just HTML / CSS / Javascript with the help of this great framework called PhoneGap.
On another post, we’ll dive deeper into PhoneGap, the hardware capabilities of the device and other developer friendly tools like TestFlightApp.
Until then, keep fiddling with it! Thanks for reading.
Update on 29/07/2013:
Removed spaces from “MyApp” and “HelloWorld” referenced above, when creating a new project with the cordova create command, as Android SDK isn’t very fond of that.
Update on 22/08/2013: Make sure to include FastClick to kill that 300ms click delay that might make your app look slow to respond. Get it from FT Labs’ GitHub repo: https://github.com/ftlabs/fastclick